Monday, May 2, 2016

Tutorial: How to Create a Router using CentOS 7

Hello and welcome to my amazing tutorial on how to configure a CentOS 7 machine into a router. This will be done in 12 EZ STEPS! Good luck.

Step 1: Add this line to your sysctl.conf file in /etc


Step 2: Find your external NIC (the one connecting you to the internet) and edit the configuration file for it, which will be located at:

/etc/sysconfig/network-scripts/[ethernet device name]

Step 3: Configure it like the image below, however, do not change the UUID or Device, as this is unique to your machine.


Step 4: Find your internal NIC (the one connecting you to the switch) and edit the configuration file for it, which will be located at the same location.

Step 5: Configure it to the image below, but do not change Name, Device, or UUID, since it's unique to you. The IPADDR is openly changeable to what you wish it to be, but I suggest leaving it like that. The HWADDR line, is also unique, and will not be the one in the image below. To find this, you must type "ip a" into the command line, then look for the MAC Address of the Internal NIC (it will look similar to the one in the image), then copy that specific address into the file on the HWADDR line.


Step 6: Install dnsmasq with the following command:

"yum install dnsmasq"

Step 7: Type the following commands (in order), to get things started:

"start dnsmasq.service"
"systemctl start dnsmasq.service"
"systemctl enable dnsmasq.service" <---- To get it enabled on boot

Step 8: Open port 53 using this command:

"Firewall-cmd --permanent --add-port=53/udp --zone=internal

Step 9: Reload the firewall like so:

"Firewall-cmd --reload"

Step 10: Quickly go onto one of your clients, and find the External NIC (which will be connected to the switch) and edit the configuration file at:

"/etc/sysconfig/network-scripts/[ethernet device name]"

Step 11: Add two new lines:

"DNS1= 8.8.8.8"
"DNS2= 8.8.4.4"

Step 12: Now you must configure DHCP. Do this:


Shoutout to: Copyright 2007-2014 Server World - All Rights Reserved
Marco Sirabella, and Jonathan from the famous blog:
jonlinuxdiz.blogspot.com

Thanks bros, and have a great day.

Copyright 1969-2069 Martin Is Awesome - No Rights Reserved

Wednesday, April 20, 2016

Week 23: Day 060 - Managing Logical Volumes


This blog post will be dedicated to logical volumes. The main reason for using this is if for example, you ran out of space on your logical volume, you take available disk space from the volume group. If there's no space on the volume group, get a new physical volume. In essence this is like if you lost space on your hard drive, you take space from something else, and if there is none, buy and use a new hard drive.

In a LVM architecture, there are several layers. They can range from disks to partitions, logical units, and yadda yadda. The storage devices can be flagged as physical volumes, which makes them usable in LVM. Here's the hierarchy: Physical Disks, Volume Group, Logical Volumes, and File Systems. This will work on both EXT4 and XFS. Data can be moved to the volume group using "pvmove". If a hard disk is failing, it can be removed from the volume group.

To create logical volumes you need to take care of physical volume (PV) and the volume group (VG), while assigning physical volumes to it. Finally the logical volume (LV) itself will have to be created. The only commands I need to remember are: "pv", "vg", and "lv".

------------------------------------------------------------------------------------------------------------
One of the great benefits of LVM is that you can resize it. The "vgextend" command is used to add storage to a volume group, and the "vgreduce" command is used to take physical volumes out of a volume group (which can lead to some additional complications). For the RHCSA test, you need to know how to extend the available storage in volume groups. This procedure is relatively easy:

1. Make sure that a physical volume or device is available to be added to the volume group.

2. Use vgextend to extend the volume group. The new disk space will show immediately in the volume group.

Logical volumes can be extended with the "lvextend" command.To grow the logical volume size, use lvresize, followed by the -r option to resize the file system used on it. 

Perfect example of its use:
  • lvresize -L +1G -r /dev/vgdata/lvdata.
  •  lvresize -r -l 75%VG /dev/vgdata/lvdata This resizes the logical volume so that it will take 75% of the total disk space in the volume group.
  • lvresize -r -l +75%VG /dev/vgdata/lvdata This tries to add 75% of the total size of the volume group to the logical volume. (Notice the difference with the previous command.)
  •  lvresize -r -l +75%FREE /dev/vgdata/lvdata This adds 75% of all free disk space to the logical volume.
  • lvresize -r -l 75%FREE /dev/vgdata/lvdata This resizes the logical volume to a total size that equals 75% of the amount of free disk space. (Notice the difference with the previous command.)

Week 23: Day 059 - Managing Partitions


Hello, today I'm going to talk about managing MBR and GPT partitions, and touch on mounting file systems. MBR stands for " Master Boot Record", and GPT stands for "GUID Partition Table". This one might be a little long, so let's get right into it.

Basically, MBR is ancient and it was made in the 80s, so soon it will be deprecated. At first it was defined with a size of 512 bytes on the hard drive. Let's talk about GPT now. This is exponentially better, this is why. The upsides to using GPT not only include having up to 120 partitions, but also having up to 8 zetabytes of space available on each one, the 2 TiB limit no longer exists, and because space that is available to store partitions is much bigger than 64 bytes, which was used in MBR, there is no longer a need to distinguish between primary, extended, and logical partitions. GPT uses a 128-bit global unique ID (GUID) to identify partitions, and backup copy of the GUID partition table is created by default at the end of the disk.

------------------------------------------------------------------------------------------------------------

Get ready for some exercises. Here I will be responding to the exercise underneath the steps, as usual. Basically, this will cover the creation of MBR and GPT partitions. A few quick notes however, fdisk is the command associated with MBR, while gdisk is associated with GPT.

This exercise has been written to use an installation of RHEL/CentOS that contains nonpartitioned disk space. If you do not have such an installation, you can use a second disk device on your demo environment. This can be a virtual disk that is added through your virtualization program, or a USB flash drive if working on a physical installation. In that case, make sure the device names in this exercise are replaced with the device names that match your hardware.

------------------------------------------------------------------------------------------------------------

Quick Note: Swap is RAM (fake according to Marco) which is derived from the hard drive.

------------------------------------------------------------------------------------------------------------

I won't even get into mounting at this point, I've learned a lot about it ever since that var issue that Marco and I had. Thanks for reading, and goodbye.

Sunday, April 3, 2016

Week 22: Day 058 - Configuring Logging


Hello, it's been quite a while since my last blog post. We had a one week spring break, which was much needed in my case. This week, we're gonna talk about logging and partitions. You ready? Let's get riiiiiight into the blog post.

First, we got a few examples of ways you can write log information. There's Direct Write, rsyslogd, and journald. In terms of journald, it provides an advanced log management system. It collects and store information regarding booting, kernel info, and service. To query/check this, you type "journalctl". When checking the logs for this in /var/log/messages, you'll find that it displays the date and timestamp along with the military time and the host that it came from. It will more importantly show you the service/process name, and the contents of the message. To look at this live do "tail -f <logfile>" and it will show you the live bits of what's going on with the log file (ctrl-c will close this obviously). Here's an exercise show you:

1. Open a root shell.

Obviously.

2. From the root shell, type tail -f /var/log/messages.

This shows you the last ten lines of the the file "messages", which contain just that.

3. Open a second terminal window. In this terminal window, type su - user to open a subshell as user.

This opened another shell under my username.

4. Type su - to open a root shell, but enter the wrong password.

I usually use sudo su. When entering the wrong password nothing will be logged.

5. Notice that nothing appears in /var/log/messages. That is because login-related errors are not written here.

6. From the user shell, type logger hello. You’ll see the message appearing in the /var/log/messages file in real time.

Interesting shortcut.

7. In the tail -f terminal, use Ctrl+C to stop tracing the messages file.

8. Type tail -n 20 /var/log/secure. This shows the last 20 lines in /var/log/secure, which also shows the messages that the su - password errors have generated previously.

This is where it's stored instead of the messages file, it's in the "secure" file.

------------------------------------------------------------------------------------------------------------

Let's move on to rsyslogd. This is similar to journald. It uses facilities, priorities and destinations:
  • A facility specifies a category of information that is logged. Rsyslogd uses a fixed list of facilities, which cannot be extended. This is because of backward compatibility with the legacy syslog service.
  •  A priority is used to define the severity of the message that needs to be logged. When specifying a priority, by default all messages with that priority and all higher priorities are logged.
  • A destination defines where the message should be written to. Typical destinations are files, but rsyslog modules can be used as a destination as well, to allow further processing through an rsyslogd module.
When specifying a destination, it's often a file, and the command must start hyphenated (Ex: -/var/log/maillog). Devices can also be used. The different severity levels are: warn, err/error, crit, alert, emerg/panic. The facilities are different categories of info like cron, dameon, or mail.

In this exercise, you learn how to change rsyslog.conf. You configure the Apache service to log messages through syslog, and you create a rule that logs debug messages to a specific file.

1. By default, the Apache service does not log through rsyslog, but keeps its own logging. You are going to change that. To start, type yum install -y httpd to install the Apache service.

Apache is widely used for Linux web-servers.

2. After installing the Apache service, open its configuration file /etc/http/conf/httpd.conf and add the following line to it:

ErrorLog syslog:local1

3. Type systemctl restart httpd.

4. Now create a line in the rsyslog.conf file that will send all messages that it receives for facility local1 (which is now used by the httpd service) to the file /var/log/httpd-error.log. To do this, include the following line:

5. Tell rsyslogd to reload its configuration, by using systemctl restart httpd.

6. All Apache error messages will now be written to the httpd-error.log file.

7. From the Firefox browser, go to http://localhost/nowhere. Because the page you are trying to access does not exist, this will be logged to the Apache error log.

8. Now let’s create a snap-in file that logs debug messages to a specific file as well. To do this, type echo “*.debug /var/log/messages/messages-debug” > /etc/rsyslogd/debug.conf.

9. Again, restart rsyslogd using systemctl restart rsyslogd.

10. Use the command tail -f /var/log/messages-debug to open a trace on the newly created file.

11. Type logger -p daemon.debug “Daemon Debug Message”. You’ll see the debug message passing by.

12. Use Ctrl+C to close the debug log file.

Moving on to Rotating Log files. To prevent syslog messages from filling up your system completely, the log messages can be rotated. So, if /var/log/messages is rotated on January 17, 2015, the rotated filename will be /var/log/messages-20150115. The default settings for log rotation are kept in the file /etc/logrotate.conf where you can customize the log rotation settings.

--------------------------------------------------------------------------------------------------------------------------

Finally, let's talk about journald. This is an alternative to rysyslog. If you want to see the last messages that have been logged, you can use journalctl -f, which shows the last lines of the messages where new log lines are automatically added. You can also type journalctl and use (uppercase) G to go to the end of the journal.

In this exercise, you learn how to work with different journalctl options.

1. Type journalctl. You’ll see the content of the journal since your server last started, starting at the beginning of the journal. The content is shown in less, so you can use common lesscommands to walk through the file.

2. Type q to quit the pager. Now type journalctl --no-pager. This shows the contents of the journal without using a pager.

3. Type journalctl -f. This opens the live view mode of journalctl, which allows you to see new messages scrolling by in real time. Use Ctrl+C to interrupt.

4. Type journalctl and press the Tab key twice. This shows specific options that can be used for filtering. Type, for instance, journalctl _UID=0.

5. Type journalctl -n 20. The -n 20 option displays the last 20 lines of the journal (just like tail -n 20).

6. Now type journalctl -p err. This command shows errors only.

7. If you want to view journal messages that have been written in a specific time period, you can use the --since and --until commands. Both options take the time parameter in the format YYYY-MM-DD hh:mm:ss. Also, you can use yesterday, today, and tomorrow as parameters. So, type journalctl --since yesterday to show all messages that have been written since yesterday.

8. journalctl allows you to combine different options, as well. So, if you want to show all messages with a priority err that have been written since yesterday, use journalctl --since yesterday -p err.

9. If you need as much detail as possible, use journalctl -o verbose. This shows different options that are used when writing to the journal (see Listing 13.3). All these options can be used to tell the journalctl command which specific information you are looking for. Type, for instance, journalctl _SYSTEMD_UNIT=sshd.service to show more information about the sshd systemd unit.


The command "journalctl -o verbose" is important since it shows all the important information. By default, the journal is stored in the file /run/log/journal. The entire /run directory is used for current process status information only, which means that the journal is cleared when the system reboots. Even when the journal is written to the permanent file in/var/log/journal, that does not mean that the journal is kept forever. Here's how to make the journal permanent:

1. Open a root shell and type mkdir /var/log/journal.

2. Before journald can write the journal to this directory, you have to set ownership. Type chown root:systemd-journal /var/log/journal, followed by chmod 2755 /var/log/journal.

3. Next, you can either reboot your system (restarting the systemd-journald service is not enough) or use the killall -USR1 systemd-journald command.

4. The systemd journal is now persistent across reboots. If you want to see the log messages since last reboot, use journalctl -b.

--------------------------------------------------------------------------------------------------------------------------

Review Questions

1. Which file is used to configure rsyslogd?

/etc/rsyslog.conf

2. Which configuration file contains messages related to authentication?

/var/log/secure

3. If you do not configure anything, how long will it take for log files to be rotated away?

Around 1 month, 5 weeks to be exact

4. Which command enables you to log a message from the command line to the user facility, using the notice priority?

logger -p user.notice "(enter text here)"

5. Which line would you add to write all messages with a priority of info to the file /var/log/messages.info?

"*.=info /var/log/messages.info" in /etc/rsyslog.conf

6. Which configuration file enables you to allow the journal to grow beyond its default size restrictions?

/etc/systemd/journal.d.conf

7. Which command enables you to see new messages in the journal scrolling by in real time?

journalctl -f

8. Which command enables you to see all journald messages that have been written for PID 1 between 9:00 a.m. and 3:00 p.m.?

journalctl _PID=1 --since 9:00:00 --until 15:00:00

9. Which command enables you to see journald messages since last reboot on a system where a persistent journal has been configured?

journalctl -b

10. Which procedure enables you to make the journald journal persistent?

killella -USR1 systemd-journald

Wednesday, March 16, 2016

Week 22: Day 057 - Scheduling Tasks


Today we will be learning about timing tasks, with tools mainly such as cron. I've been aware of that tool for a while, and it's very useful for timing actions on your machine, many times being something along the lines of shutting down your computer at a scheduled time.

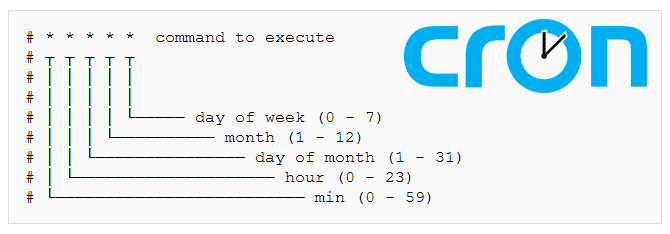
What is cron? Cron is a service which runs processes at specific times. Some system tasks are already using cron, probably without your awareness, such as "logrotate" which automatically gets rid of old logs at a certain time. To see what's going on with cron right now at this second, type "systemctl status crond -l". The most important part is the first part, because it shows that it's loaded. These are some examples of how you schedule cron properly:
  •  * 11 * * * Any minute between 11:00 and 11:59 (probably not what you want)
  • 0 11 * * 1-5 Every day at 11 a.m. on weekdays only
  • 0 7-18 * * 1-5 Every hour on weekdays on the hour
  • 0 */2 2 12 5 Every 2 hours on the hour on December second and every Friday in December
Instead of editing /etc/crontab you can create a configuration file for it seperately, and this will be put into /etc/cron.d then put the scripts for those cron commands into /etc/cron.hourly or cron.daily or cron.monthly, you get the point! User specific files are created with crontab -e (username). This is extremely useful if you don't want to do the job for all users. Then there's anacron which is really a configuration file for cron and where these script files are put. If you want to configure this file go to /etc/ancrontab it's a file not a directory. To restrict who can use cron make a file in /etc/cron.allow and add users on there to whitelist them so they may use it. Then make a similar one in /etc/cron.deny which will deny cron privileges to whomever is attempting use it. Furthermore here's how! In this exercise, you apply some of the cron basics. You schedule cron jobs using different mechanisms:

1. Open a root shell. Type cat /etc/crontab to get an impression of the contents of the /etc/crontab configuration file.

From what I see using cat, this file has got a neat layout showing you how to determine times and dates.

2. Type crontab -e. This opens an editor interface that by default uses vi as its editor. Add the following line:
0 2 * * 1-5 logger message from root

By default this uses "vi", and it opened up crontab automatically.

3. Use the vi command :wq! to close the editing session and write changes.

Same save command to exit as vim.

4. Use cd /etc/cron.hourly. In this directory, create a script file with the name eachhour that contains the following line:
logger This message is written at $(date)

The file does not need an extension as long as it's executable, but as a norm use .sh

5. Use chmod +x eachhour to make the script executable; if you fail to make it executable, it will not work.

This makes it executable automatically, very important to note, instead of manually doing it.

6. Now enter the directory /etc/cron.d and in this directory create a file with the name eachhour. Put the following contents in the file:
11 * * * * root logger This message is written from /etc/cron.d

7. Save the modifications to the configuration file and go work on the next section. (For optimal effect, perform the last part of this exercise after a couple of hours.)

Hopefully it will work haha.

8. After a couple of hours, type grep written /var/log/messages and read the messages that have been written which verifies correct cron operations.

Can't really verify this, but it's probably true.
------------------------------------------------------------------------------------------------------------

Finally, let's talk about scheduling jobs with atd. This is another method of timing processes on your system. In this exercise, you learn how to schedule jobs using the atd service:

1. Type systemctl status atd. In the line that starts with Loaded:, this command should show you that the service is currently loaded and enabled, which means that it is ready to start receiving jobs.

It's enabled and displays that the job spooling tools are active and working properly.

2. Type at 15:00 (or replace with any time near to the time at which you are working on this exercise).

It changed the $ to at> which is also done by python. I probably need to type in a special command.

3. Type logger message from at. Use Ctrl+D to close the at shell.

This created a new job.

4. Type atq to verify that the job has indeed been scheduled.

This indeed scheduled a job. I believe that this tool atd is a really useful tool to shortcut editing and creating script files for cron, and simply typing in commands to atd.
------------------------------------------------------------------------------------------------------------

Review Questions

1. Where do you configure a cron job that needs to be executed once every 2 weeks?

You configure it at /etc/cron.weekly

2. How do you specify the execution time in a cron job that needs to be executed twice every month, on the 1st and the 15th of the month at 2 p.m.?

0 13 1,15 * *

3. How do you specify cron execution time for a job that needs to run every 2 minutes on every day?

*/2

4. How do you specify a job that needs to be executed on September 19 and every Thursday in September?

70 -1 19 sep 4*

5. Which three valid day indicators can you use to specify that a cron job needs to be executed on Sunday?

0, 7, or sun

6. Which command enables you to schedule a cron job for user lisa?

"crontab -e" then type "(job scheduling) lisa /cron.d"

7. How do you specify that user boris is never allowed to schedule jobs through cron?

echo boris >> /etc/cron.deny

8. You need to make sure that a job is executed every day, even if the server at execution time is temporarily unavailable. How do you do this?

Trick question

9. Which service must be running to schedule at jobs?

cron.d

10. Which command enables you to find out whether any current at jobs are scheduled for execution?

atq

Wednesday, March 9, 2016

Week 21: Day 055 - Managing Software


Hello, this week I'm focusing on yum and rpm. In other words, this is about downloads and repositories. Although I already have a good understanding of it's basic uses, I will delve into more specific things.

First of all, "Red-Hat Package Manager" is a way to archive packages and provide its metadata. This program which comes with Red Hat, is immensely important when dealing with repos. Repositories should be kept up to date as it's important for installations. In the past I have made several repos, in my successful attempt to install Google Chrome and Spotify. To tell the server which repo to use, make the extensions of your repository files ".repo".

In this exercise, you learn how to create your own repository. To perform this exercise, you need to have access to the CentOS installation disk or ISO file.

1. Insert the installation disk in your virtual machine. This mounts it on the directory /run/media/user/CentOS 7 x86_64. Alternatively, you can manually mount the ISO on the /mnt directory, using mount -o loop /path/to/centos.iso /mnt.

I don't really need to do this part.

2. Type mkdir /repo to create a directory /repo that can be used as repository.

3. If you want to create a complete repository, containing all the required files, type cp $MOUNTPATH/Packages/* repo. (Replace $MOUNTPATH with the name of the directory on which the installation disk is mounted.) If you do not need a complete repository, you can copy just a few files from the installation disk to the /repo directory.

4. Type yum install -y createrepo to ensure that the createrepo RPM package is installed.

OR you can just make a new file with the extension ".repo"

5. Type createrepo /repo. This generates the repository metadata, which allows you to use your own repository.

If you do it my way, you open the repo file you made.

6. Now that you have created your own repository, you might as well start using it. In the /etc/yum.repos.d directory, create a file with the name my.repo. Make sure this file has the following contents:
[myrepo]
name=myrepo
baseurl=file:///repo

Then type it into this file. That's all you need, then you're done!

7. Type yum repolist to verify the availability of the newly created repository. It should show the name of the myrepo repository, including the number of packages that is offered through this repository

Done.
------------------------------------------------------------------------------------------------------------

Second of all, let's talk about yum! Even though it may be deprecated some day by dnf, right now it's important for us to use this instead, since it will be on the test. yum works with repositories, which is why RPM is so important, and why they go hand in hand.

Here are all the important yum commands:

- yum install (name of file)
- yum search (name of file)
- yum update (name of file)
- yum history
- yum list
- yum provides

That's pretty much it haha. Thanks for reading.


Review Questions

1. You have a directory containing a collection of RPM packages and want to make that directory a repository. Which command enables you to do that?

createrepo

2. What needs to be in the repository file to point to a repository on http://server.example.com/repo?

[xxxx]
name=xxxxx
baseurl=http://server.example.com/repo?

3. You have just configured a new repository to be used on your RHEL computer. Which command enables you to verify that the repository is indeed available?

yum repolist

4. Which command enables you to search the RPM package containing the file useradd?

5. Which two commands do you need to use to show the name of the yum group that contains security tools and shows what is in that group?

6. Which command enables you to install an RPM that you have downloaded from the Internet and which is not in the repositories?

7. You want to make sure that an RPM package that you have downloaded does not contain any dangerous script code. Which command enables you to do so?

8. Which command reveals all documentation in an RPM?

9. Which command shows the RPM a file comes from?

10. Which command enables you to query software from the repository?

Monday, March 7, 2016

Week 21: Day 054 - Process Management


Everything that happens on a Linux server requires the creation of processes. This chapter will cover specifics on what these processes do. When a process begins, it uses multiple threads, and a thread is a bunch of sub-processes happening at the same time.

To immediately start a job in the background, prefix the command by starting it with the "&" symbol. To return it to the foreground do use the "fg" command. To terminate a process use the "kill" command.


In this exercise, you apply the commands that you just learned about to manage jobs that have been started from the current shell.

1. Open a root shell and type the following commands:

sleep 3600 &
dd if=/dev/zero of=/dev/null &
sleep 7200

2. Because you started the last command with no & after the command, you have to wait 2 hours before you get control to the shell back. Type Ctrl+Z to stop it.

I can no longer access the shell, ctrl-z will stop it.

3. Type jobs. You will see the three jobs that you just started. The first two of them have the Running state, and the last job currently is in the Stopped state.

There are two running jobs, and the one that I stopped.

4. Type bg 3 to continue running job 3 in the background. Notice that because it was started as the last job, you did not really have to add the number 3.

It shows three running jobs.

5. Type fg 1 to move job 1 to the foreground.

This moves "sleep 2500" to the foreground.

6. Type Ctrl+C to cancel job number 1 and use jobs to confirm that it is now gone.

I ended that job, and it no longer exists.

7. Use the same approach to cancel jobs 2 and 3 also.

They're all dead.

8. Open a second terminal on your server.

9. From that second terminal, type dd if=/dev/zero of=/dev/null &.

Don't know what this did.

10. Type exit to close the second terminal.

11. From the other terminal, start top. You will see that the dd job is still running. From top, use k to kill the dd job.

It asked me to type the number of the running job, and I chose the one that said "dd", now it's dead.

You cannot manage a single thread, however you can manage processes. When managing processes, it's easy to identify kernel processes because it's in "[ ]" brackets. Use the "ps aux | head" command to test take a look at an example of kernel processes. Now, "ps" retrieves running processes information, there are several modifiers for it. "aux" will show you a short summary of these processes. To look for the exact command use to start a given process, type "ps -ef". To see hierarchical relationship between parent and child processes types "ps fax". Note: hyphens are optional.


In this exercise, you learn how to work with ps, nice, kill, and related utilities to manage processes.

1. Open a root shell. From this shell, type dd if=/dev/zero of=/dev/null &. Repeat this command three times.

Created 4 different jobs of this.

2. Type ps aux | grep dd. This shows all lines of output that have the letters dd in them; you will see more than just the dd processes, but that should not really matter. The processes you just started are listed last.

This searches for dd in all of the.

3. Use the PID of one of the dd processes to adjust the niceness, using renice -n 5 <PID>. Notice that in top you cannot easily get an overview of processes and their current priority.

I got an error.

4. Type ps fax | grep -B5 dd. The -B5 option shows the matching lines, including the five lines before that. Becauseps fax shows hierarchical relationships between processes, you should also find the shell and its PID from which all the dd processes were started.

5. Find the PID of the shell from which the dd processes were started and type kill -9 <PID>, replacing <PID> with the PID of the shell you just found. You will see that your root shell is closed, and with it, all of the dd processes. Killing a parent process is an easy and convenient way to kill all of its child processes also.


Review Questions

1. Which command gives an overview of all current shell jobs?

jobs

2. How do you stop the current shell job to continue running it in the background?

Ctrl-Z then bg

3. Which keystroke combination can you use to cancel the current shell job?

Ctrl-C

4. A user is asking you to cancel one of the jobs he has started. You cannot access the shell that user currently is working from. What can you do to cancel his job anyway?

ps aux and kill <PID>

5. Which command would you use to show parent-child relationships between processes?
ps fax

6. Which command enables you to change the priority of PID 1234 to a higher priority?

ps -nn p 1234

7. On your system, 20 dd processes are currently running. What is the easiest way to stop all of them?

killall dd

8. Which command enables you to stop the command with the name mycommand?

pkill mycommand

9. Which command do you use from top to kill a process?

k

10. How would you start a command with a reasonably high priority without risking that no more resources are available for other processes?

nice -5